Get insights into the indications, contraindications, complications, and paracentesis procedure steps with Hospital Procedures Consultants, your tried and trusted guide for CME.
Indications
Paracentesis can be either diagnostic or therapeutic.
Diagnostic paracentesis can be performed to determine the cause of new-onset ascites and detect cancerous cells. It’s also used to rule out suspected spontaneous bacterial peritonitis (SBP) in patients with the following symptoms: gastrointestinal bleeding, history of prior SBP, and cirrhotic patients with ascitic fluid protein < 1.5 g/dl, total bilirubin >2.5 mg/dL, and creatinine > 1.2 mg/dl.
Therapeutic paracentesis drainage is used for the management of:
- Refractory, cirrhotic ascites
- Hepatorenal syndrome (as an adjunct)
- Respiratory compromise secondary to ascites
- Abdominal pain or pressure secondary to ascites. This includes compartment syndrome, overall prevalence ranges from 0.0% to 36.4%.
Large-volume paracentesis (LVP) is indicated for the treatment of refractory, tense ascites, which develop in approximately 10% of patients with cirrhosis. It’s reasonable to infuse 6 to 8 g of albumin per liter of ascites removed to decrease the incidence of PICD, hyponatremia, and mortality in patients with cirrhosis undergoing LVP.
Contraindications
Uncooperative patients, including those with infected abdominal walls, acute abdomens requiring immediate exploratory surgery, and fibrinolysis or disseminated intravascular coagulation (DIC), are absolute contraindications for the paracentesis procedure.
Other (relative) contraindications include:
- Ileus
- Pregnancy
- Organomegaly
- Distended urinary bladder
- Intestinal obstruction with bowel distention
Note that coagulopathy is not an absolute contraindication for paracentesis. Research has shown that the frequency of bleeding complications requiring red cell transfusions after paracentesis or thoracentesis was very low—0.2% of total events.
However, in non-emergency situations, it’s best to delay the procedure until no further anticoagulant activity is recorded to reduce the risk of bleeding.
Thrombocytopenia (platelet count <20 × 103/μL) also raises red flags for the paracentesis procedure. However, among 304 ultrasound-guided paracentesis in thrombocytopenic patients, the incidence of major bleeding requiring blood transfusion was 1%, which shows that it’s safe to perform without correction.
Complications
All procedures have complications; paracentesis is not an exception.
It is generally considered safe and effective, with minor complications like persistent and major fluid leakage (0.8% to 1.7%), soft tissue infection at the needle insertion site, and abdominal wall hematoma. Other (major and rare) complications include:
- Hypotension
- Hepatorenal syndrome
- Spontaneous hemoperitoneum
- Bladder or intestinal perforation
- Metastatic seeding of needle tract (rare)
- Higher incidence of hypotension and renal impairment (in repeated large-volume paracentesis without plasma volume expansion)
There’s also a risk of severe hemorrhage (<0.2%). The outcome of patients with bleeding complications tends to be poor, with a 30-day mortality of 42.6%. Note that populations with liver disease are frequently affected, so watch out for signs of major bleeding: Fibrinogen level ≤70 mg/dL & MELD score >25.
Technique for the Procedure
Here are paracentesis procedure steps for the best results:
Step 1: Obtain Consent
Explain the procedure, its potential benefits, and risks to the patient before beginning the procedure. Obtain written and signed consent.
Step 2: Gather Equipment
Use prepackaged kits and trays, which contain all the equipment you need to complete the paracentesis procedure. If one is unavailable, assemble your own.
Here’s what you’ll need:
- Gauze
- 1% lidocaine
- Sterile gloves
- 11 blade scalpel
- Injection needles
- Chlorhexidine swabs
- Sterile towels or drapes
- Vials or collection bottles
- Blood collection tubing set
- Drainage bag or vacuum container
- 60ml syringe to collect samples of fluids
- Catheter with 3-way stopcock and self-sealing valve
Step 3: Verify Entry Sites and Positioning
There are two recommended areas for paracentesis.
With the midline approach, insert the needle 2 cm below the umbilicus, ensuring that the patient is in a flat, semi-recumbent position to identify fluid pockets.
If you’re taking a left lower-quadrant (LLQ) approach—which is preferred in the absence of imaging—the entry site will be 3-4 cm superior and medial towards the anterior superior iliac spine (ASIS). Make sure that the patient is in a semi-recumbent position with a left lateral tilt so that the fluid can pool in the area.
Step 4: Perform Ultrasound
Ultrasound guidance must be used to identify needle insertion sites (use Doppler), reduce the risk of complications, and avoid attempting paracentesis among patients with insufficient fluid. You can use the curvilinear or phased array probe to determine ascites and search for the largest areas with fluid. A linear array probe can localize the inferior epigastric artery in patients with ascites while avoiding injury to the vessel.
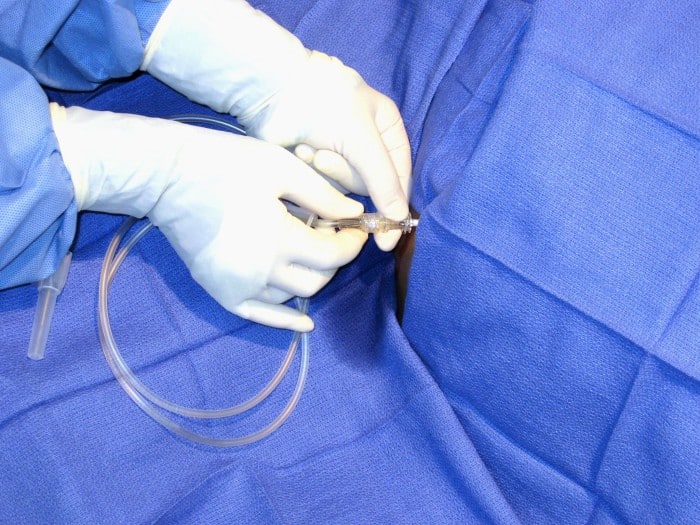
Step 5: Begin the Procedure
Here’s how to conduct a paracentesis procedure:
- Ensure the patient’s bladder is empty. This could be done voluntarily by the patient or with a Foley catheter to prevent injury to the bladder.
- Cleanse the skin with an antiseptic solution. Administer local anesthesia to the skin and subcutaneous tissue, down to the peritoneum.
- Insert the needle at the entry site using the z-track method to avoid fluid leakage through the track and apply negative pressure until you feel a loss of resistance.
- At this point, you should have a steady flow of ascitic fluid.
- If the fluid does not return, perform an ultrasound on the abdomen to ensure that ascites are present. If the patient is morbidly obese, use a longer needle.
- If the fluid is slow-flowing, ensure that the collection tubing is not kinked/collapsed, and try a larger angiocath (14 gauge) or a Caldwell needle.
- Advance the catheter over the needle.
- Remove the needle after collecting 50 mL of ascitic fluid in the syringe for diagnostics. You can also attach the tubing to a three-way stopcock to drain large volumes of fluid into the vacuum container or drainage bag.
- Once you’ve drained the desired amount of fluid, you can remove the catheter.
Make sure to apply pressure directly on the insertion site to stop any bleeding.
Step 6: Send Ascitic Fluid for Testing
While cirrhosis accounts for the majority (75%) of ascites, several other diseases can lead to it. By sending samples of ascitic fluid to the lab for testing, you can develop a differential diagnosis and offer a well-informed treatment plan.
Some areas to focus on include:
- Amylase
- Cell counts
- Tumor markers
- Bacterial culture
- Total protein (TP)
- Gross appearance
- Lactate dehydrogenase (LDH)
- Adenosine deaminase enzyme (ADA)
You can also use the sample to calculate the Serum Ascites Albumin Gradient (SAAG).
If it’s high (≥ 1.1 gm/dL), it indicates a high probability of alcoholic hepatitis, Budd-Chiari syndrome, cirrhotic ascites, fatty liver of pregnancy, fulminant hepatic failure, multiple liver metastases, myxedema, portal vein thrombosis, or veno-occlusive disease. But if it’s low (< 1.1 gm/dL), it is indicative of biliary ascites, bowel infarction/obstruction, lupus serositis, nephrotic syndrome, pancreatic ascites, peritoneal carcinomatosis, peritoneal tuberculosis, or postoperative lymphatic leak.
Brush Up on Your Paracentesis Skills With HPC
If you’re a healthcare professional dedicated to providing quality care, our comprehensive paracentesis course can help you master this procedure. Our educators will familiarize you with paracentesis procedure steps, giving you a better understanding of what the procedure entails.
Resources:
Kurup, A. N. Lekah, A. Reardon, S. T. Schmit, G. D. McDonald, J. S. Carter, R. E. Kamath, P. S. Callstrom, M. R. Atwell, T. D. Bleeding Rate for Ultrasound-Guided Paracentesis in Thrombocytopenic Patients. J Ultrasound Med. 2015 Oct;34(10):1833-8. doi: 10.7863/ultra.14.10034.
K P Moore and G P Aithal. Guidelines on the management of ascites in cirrhosis. Gut. 2006 Oct; 55(Suppl 6): vi1–vi12.doi: 10.1136/gut.2006.099580
Ameer, M. A. Foris, L. A. Mandiga, P. Haseeb, M. Spontaneous Bacterial Peritonitis. StatPearls. CME. 2023/08
Strang, S. G. Lieshout, E. M. M. Van Waes, O. J. F. Verhofstad, M. H. J. Prevalence and mortality of abdominal compartment syndrome in severely injured patients: A systematic review. Review J Trauma Acute Care Surg. 2016 Sep;81(3):585-92. doi: 10.1097
Banimahd, F. Spinello, I. M. Large-volume paracentesis: a fast, convenient, and safe technique. J Emerg Med. 2009 Nov;37(4):409-10. doi: 10.1016/j.jemermed.2008.09.022. Epub 2009 Jan 26
McVay, P. A. Toy, P. T. Lack of increased bleeding after paracentesis and thoracentesis in patients with mild coagulation abnormalities. Transfusion. 1991 Feb;31(2):164-71. doi: 10.1046/j.1537-2995.1991.31291142949.x
Chandel, K. Rana, S. Patel, R. K. Tripathy, T. P. Mukund, A. Bedside USG-Guided Paracentesis – A Technical Note for Beginners. J Med Ultrasound. 2022 Jul-Sep; 30(3): 215–216.