Contraindications for subclavian venous catheter placement
Patient refusal
Deep venous thrombosis of vein
Overlying burn or cellulitis
Thrombocytopenia with platelets <20,000
Anticoagulation
Inability to lie flat
Complications of Subclavian line placement
Central line-associated Bloodstream Infection (CLABSI) (femoral>IJ>subclavian)
Deep venous thrombosis (femoral > IJ = subclavian)
Pneumothorax (subclavian > IJ)
Hemothorax (subclavian > IJ)
Hematoma (femoral > subclavian = IJ)
Arterial injury or arterial cannulation (femoral > IJ > subclavian)
Bleeding (femoral > IJ > subclavian)
Air embolus (IJ = subclavian)
Dysrhythmias (IJ > subclavian)
Lost guidewire
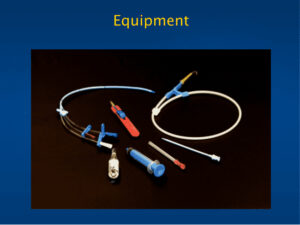
Cap
Mask
Sterile gown
Sterile gloves
Central line kit
Biopatch (if available)
Sterile occlusive dressing
Sterile saline flushes
Needleless caps
Point of care ultrasound with linear array probe
Sterile ultrasound sheath with sterile ultrasound gel and sterile rubber bands
Proper positioning and technique for ultrasound-guided axillary vein catheter placement
Trendelenberg position
Prep skin with chlorhexidine swab and allow at least 2 minutes to dry
Wide sterile drape
Apply sterile sheath over linear array probe for ultrasound-guided axillary vein placement
Identify ideal insertion site with ultrasound probe using in-plane approach
Anesthetize skin and underlying soft tissue
Advance introducer needle under real-time ultrasound guidance to cannulate axillary vein
Stabilize needle hub and remove syringe
Quickly advance wire about 20 cm through needle
Remove needle leaving wire in place
Use scalpel to nick skin
Use dilator over wire to dilate subcutaneous tract
Advance catheter over wire to appropriate depth of insertion
Remove wire leaving catheter in place
Flush all catheter ports with sterile saline
Secure catheter in place with suture
Apply biopatch at insertion site if available
Apply sterile occlusive dressing
CXR to confirm catheter tip placement
Landmarks and Technique of landmark-guided subclavian line placement
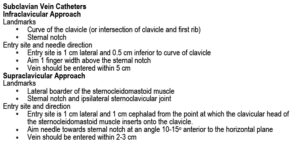
Subclavian Vein Catheters
Infraclavicular Approach
Landmarks
Curve of the clavicle (or intersection of clavicle and first rib)
Sternal notch
Entry site and needle direction
Entry site is 1 cm lateral and 0.5 cm inferior to curve of clavicle
Aim 1 finger width above the sternal notch
Vein should be entered within 5 cm
Supraclavicular Approach
Landmarks
Lateral boarder of the sterocleidomastoid muscle
Sternal notch and ipsilateral sternoclavicular joint
Entry site and direction
Entry site is 1 cm lateral and 1 cm cephalad from the point at which the clavicular head of the sternocleidomastoid muscle inserts onto the clavicle.
Aim needle towards sternal notch at an angle 10-15° anterior to the horizontal plane
Vein should be entered within 2-3 cm
Trendelenberg position
Prep skin with chlorhexidine swab and allow at least 2 minutes to dry
Wide sterile drape
Identify optimal insertion site based on landmarks above
Anesthetize skin, underlying soft tissue and periosteum of clavicle
Advance introducer needle and “walk down” clavicle keeping the needle parallel to the floor until the needle passes immediately underneath clavicle
Advance introducer needle parallel to the floor underneath the clavicle directed 1 cm above the sternal notch until a flash of blood returns then advance 2 mm further
Stabilize needle hub and remove syringe
Quickly advance wire about 20 cm through needle
Remove needle leaving wire in place
Use scalpel to nick skin
Use dilator over wire to dilate subcutaneous tract
Advance catheter over wire to appropriate depth of insertion